
⚡ Quick Guide • Handbag Rivet Rust Removal Protocol
To master how to clean rust off handbag rivets without etching delicate plating or staining adjacent seams:
- Double-Layer Isolation: Mask the rivet base with low-tack painter’s tape to shield leather pores and stitch threads from chemical leaching.
- Precision Micro-Dabbing: Apply a non-acidic brass polish using a pointed applicator swab; work in tight circular motions without applying downward force.
- Immediate Neutralization: Wipe away the gray-brown slurry with distilled water on a microfiber cloth, dry instantly, and seal with carnauba micro-wax.
- Structural vs. Cosmetic Rule: If the rivet cap wiggles or spins, internal steel oxidation has compromised the post; stop polishing and seek professional hardware replacement.
Structural Physics (Steel Core vs Brass Plating )
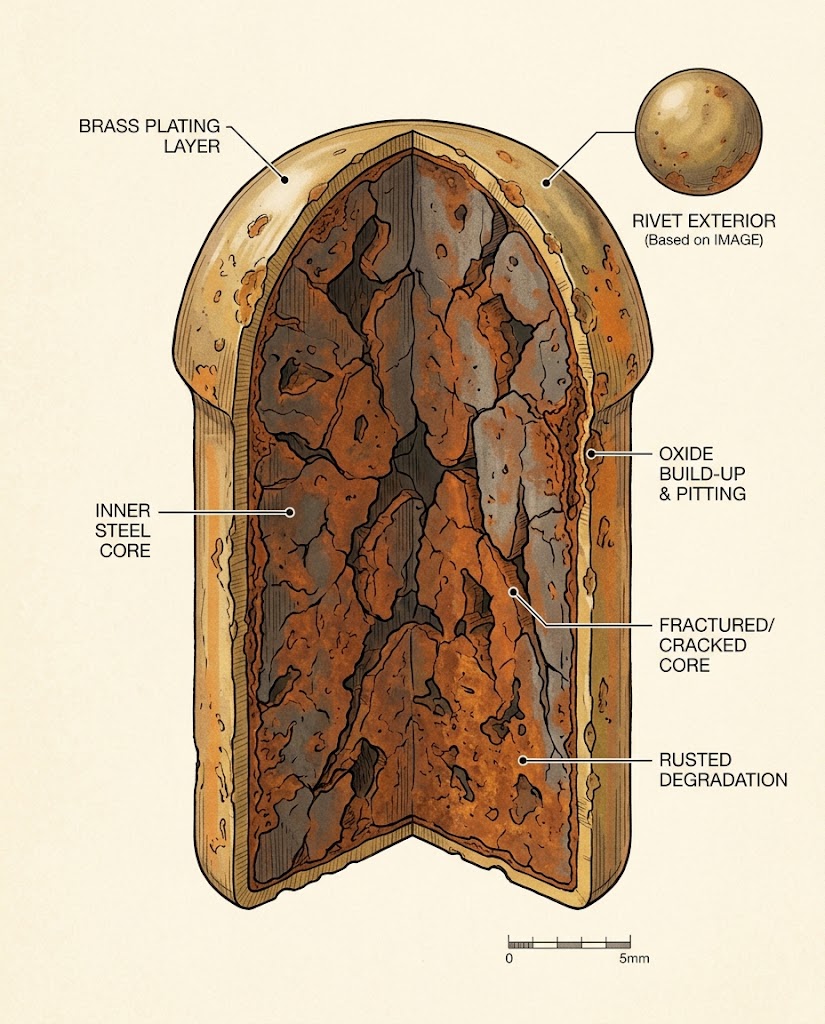
Most rivet corrosion starts beneath the surface, not on it.
That’s the core issue when learning how to clean rust off handbag rivets correctly.
The majority of designer hardware isn’t solid brass or gold. It’s a steel core wrapped in a plated finish.
That plating layer, brass, gunmetal, or palladium, is often just microns thick.
Once moisture penetrates a hairline scratch or seam in that plating, it reaches the steel core underneath.
Steel oxidizes fast. On our bench, exposed cores show visible flaking within 48-72 hours of moisture contact.
This is the mechanism behind steel rivet rust removal cases we see most often.
As the iron oxide forms, it physically expands. That expansion pushes outward, cracking the plating from the inside.
This is why surface polishing alone rarely works, the rust keeps re-emerging from underneath.
Understanding this internal pressure is essential before attempting plated rivet oxidation repair, since scrubbing too hard can shatter already-compromised plating.
Distinguishing Corrosion Types (Iron Oxide Rust vs Copper Oxide Verdigris)
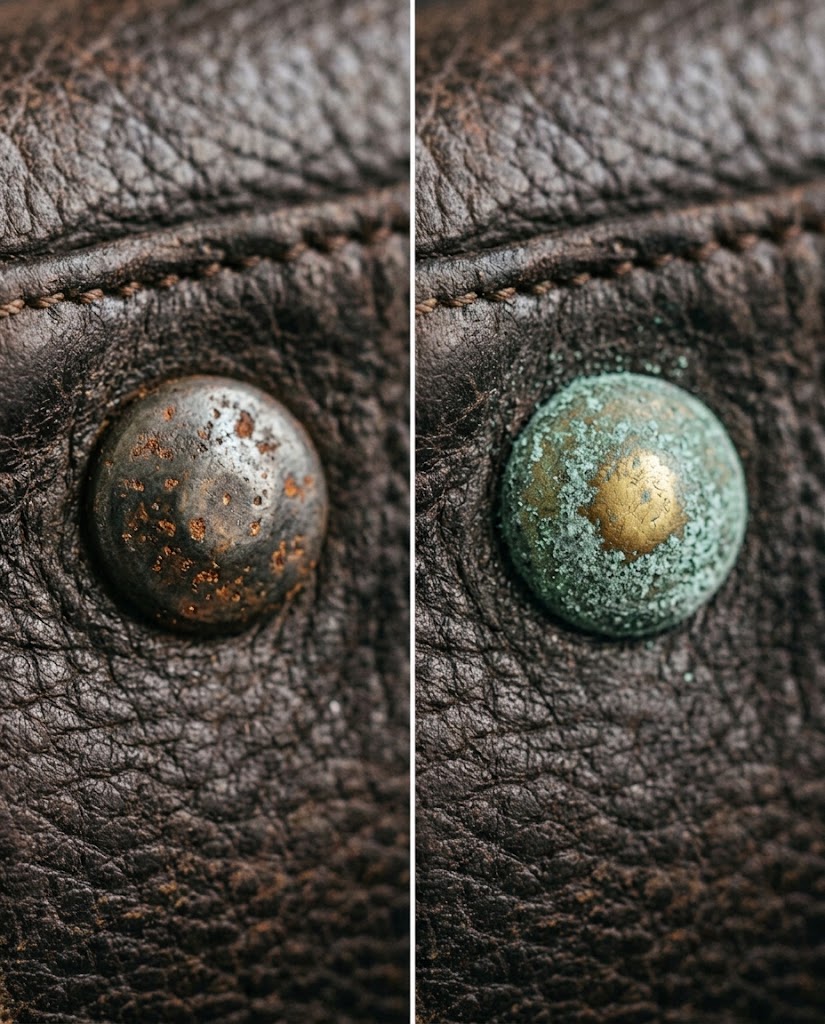
Not all discoloration on handbag hardware is rust.
Correctly diagnosing the corrosion type is the first real step in how to clean rust off handbag rivets without causing further damage.
True iron oxide rust presents as reddish-brown, granular, and often slightly raised or flaky.
It forms specifically where a steel core is exposed to oxygen and moisture.
Verdigris is a different chemical process entirely. It’s a pale green or blue-green crust.
That green layer forms when copper-based alloys, common in brass and bronze plating, react with air, humidity, or salts over time.
On the bench, we treat these as two separate protocols. Iron oxide handbag corrosion responds to gentle abrasive polishing.
Verdigris, by contrast, needs a different chemical neutralization approach entirely, since aggressive rubbing can grind copper salts deeper into the plating.
Confusing verdigris vs rust handbag hardware treatments is one of the most common at-home mistakes we encounter.
Safe Equipment Checklist
1. Precision Tools Approved for How to Clean Rust Off Handbag Rivets
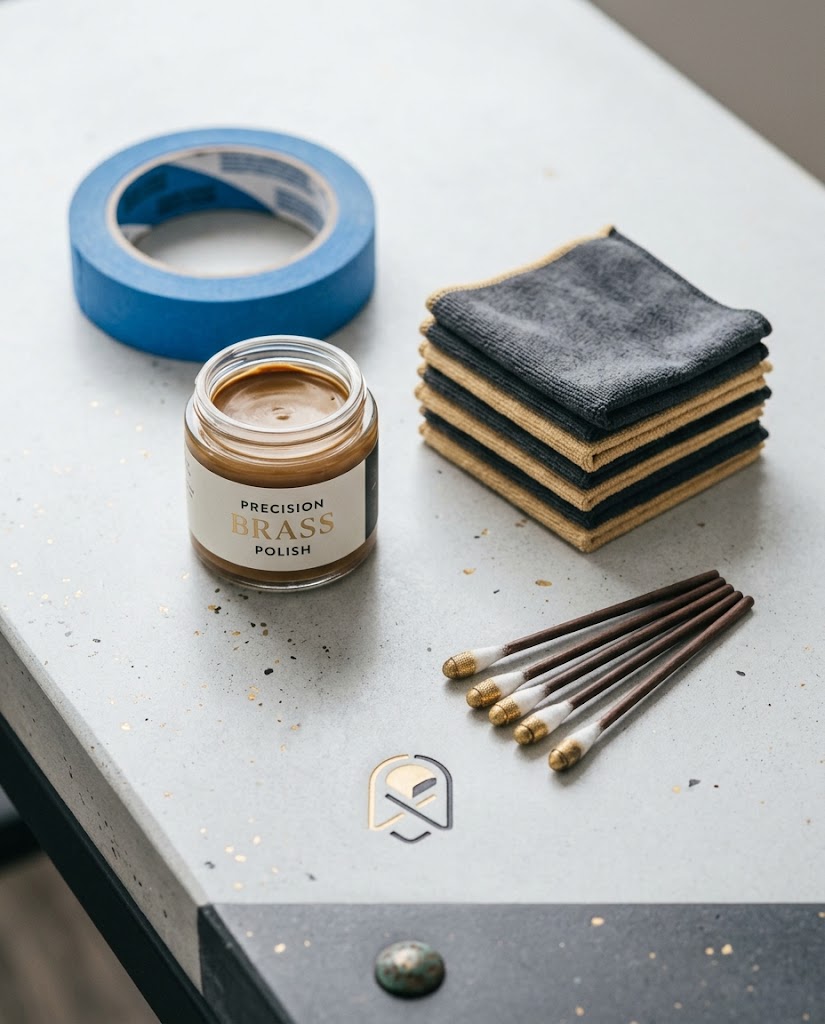
Approved supplies for this job: low-tack painter’s tape, micro-fine applicator swabs, non-acidic brass polish, and micro-fiber buffing pads.
Each tool exists for one reason, control.
Low-tack painter’s tape creates a hard boundary between metal and leather.
It needs to release cleanly without pulling at dye or finish underneath.
Micro-fine applicator swabs let you work in sub-millimeter increments around rivet edges.
Standard cotton swabs are too bulky and shed fibers into rivet crevices.
A non-acidic brass polish lifts oxidation without triggering a secondary chemical reaction on plated surfaces.
Acidic formulas dissolve rust fast, but they also etch surrounding metal and can bleed onto leather edges.
Micro-fiber buffing pads finish the job with zero abrasive grit.
They remove polish residue without introducing new scratch marks into the plating.
Together, this micro-abrasive metal polish and applicator combination is the safest way to control both pressure and contact area.
2. Prohibited Off-Niche Methods
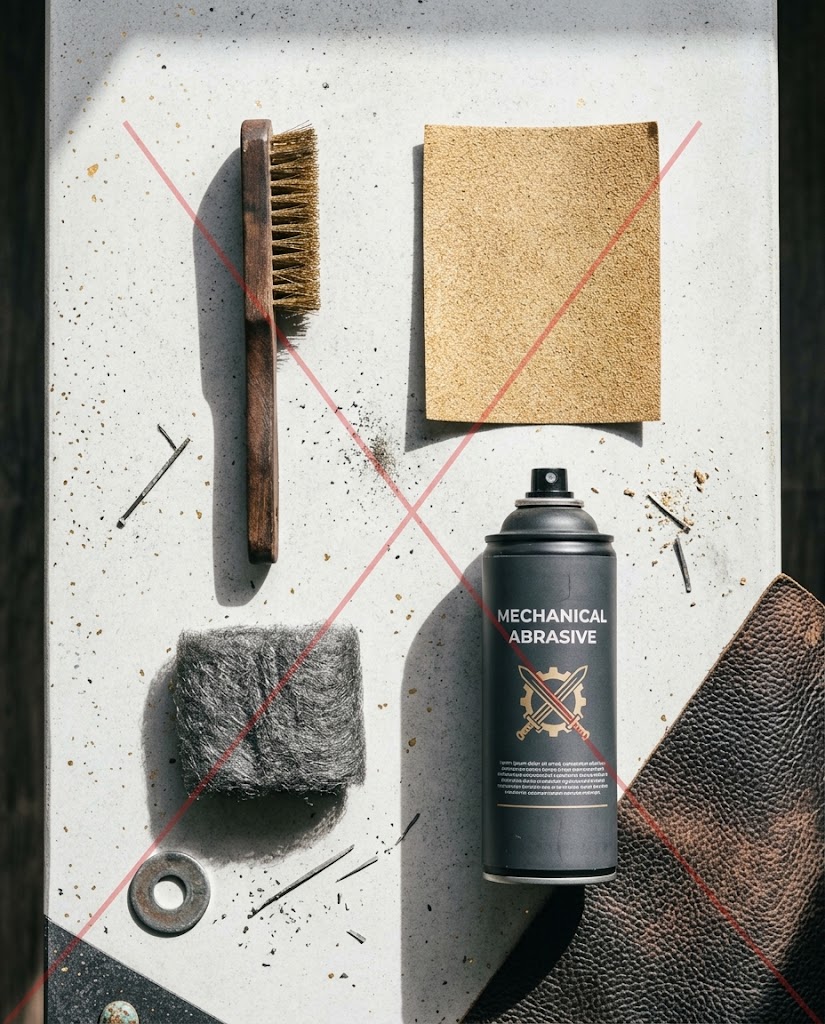
Some tools belong in a garage, not on a luxury handbag.
Wire brushes top that list.
They strip plating in seconds and leave permanent scratch trails across the rivet face.
Sandpaper is equally destructive.
Even fine-grit sandpaper removes plating layers that took decades to develop their patina.
Steel wool is another common mistake.
Tiny steel fragments can embed into the leather grain, creating new rust spots weeks later.
WD-40 and similar penetrating oils seem gentle but aren’t.
They leave an oily residue that attracts dust and can stain porous leather permanently.
Evapo-Rust and similar rust-dissolving sprays are formulated for auto parts and hardware, not plated luxury goods.
These are textbook examples of prohibited rust remover tools, effective on raw steel, but corrosive to thin decorative plating.
On the bench, hardware treated with any of these methods almost always needs full rivet replacement rather than restoration.
Protecting Surrounding Leather
1. Masking Seams and Threading Before Clean Rust Removal
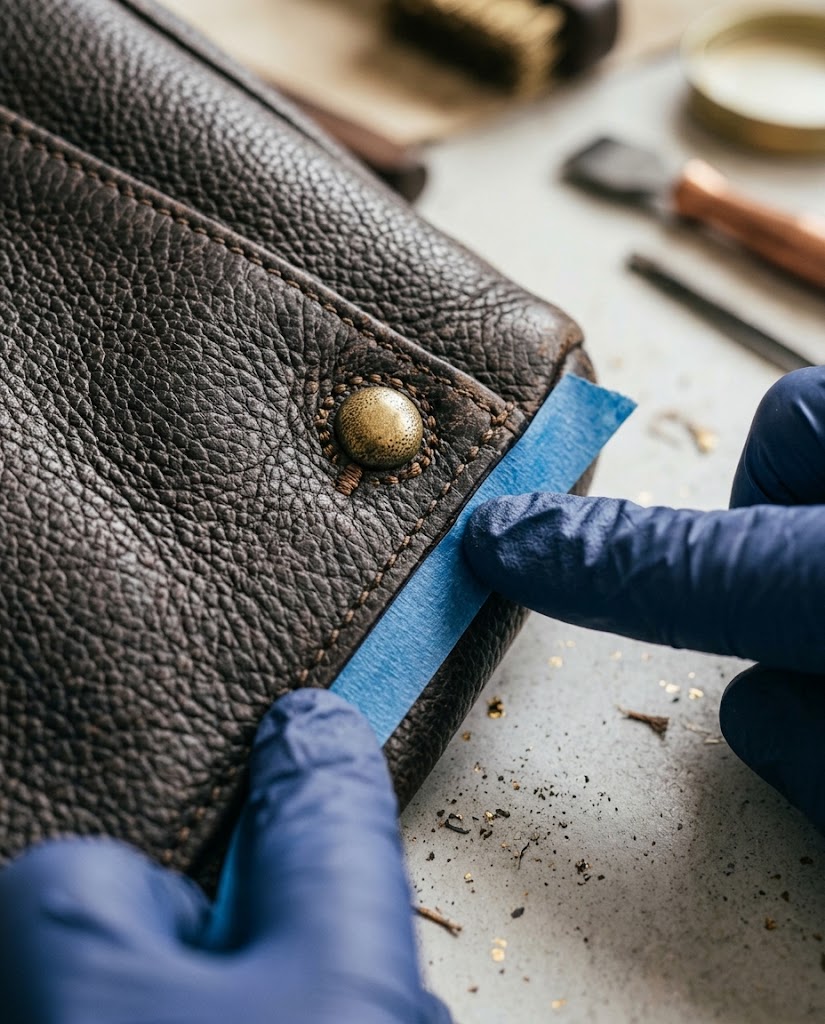
Leather masking isn’t optional, it’s the step that determines whether this repair is reversible.
Rivets sit directly against leather panels, often right along a seam.
Those seams have micro-gaps between stitches where liquid can travel.
Any acidic or oxidizing polish that seeps into those gaps reacts with the leather’s natural tannins.
That reaction produces dark, blotchy staining that’s extremely difficult to lift afterward.
Thread is even more vulnerable than the leather itself.
Cotton and linen stitching absorb liquid instantly, wicking polish deep into the seam before it’s visible on the surface.
This is why painter tape leather masking has to fully seal the rivet’s perimeter, not just cover the flat surface.
Press the tape edge down firmly along every curve where metal meets leather.
Skipping this step is the single most common cause of leather tannin acid staining we see in DIY rivet repairs.
Before applying any cleaning agent near vintage hides, identify your leather finish tolerance using [identify and clean vintage leather designer bags].
Step-by-Step Execution
1. Masking and Surface Isolation
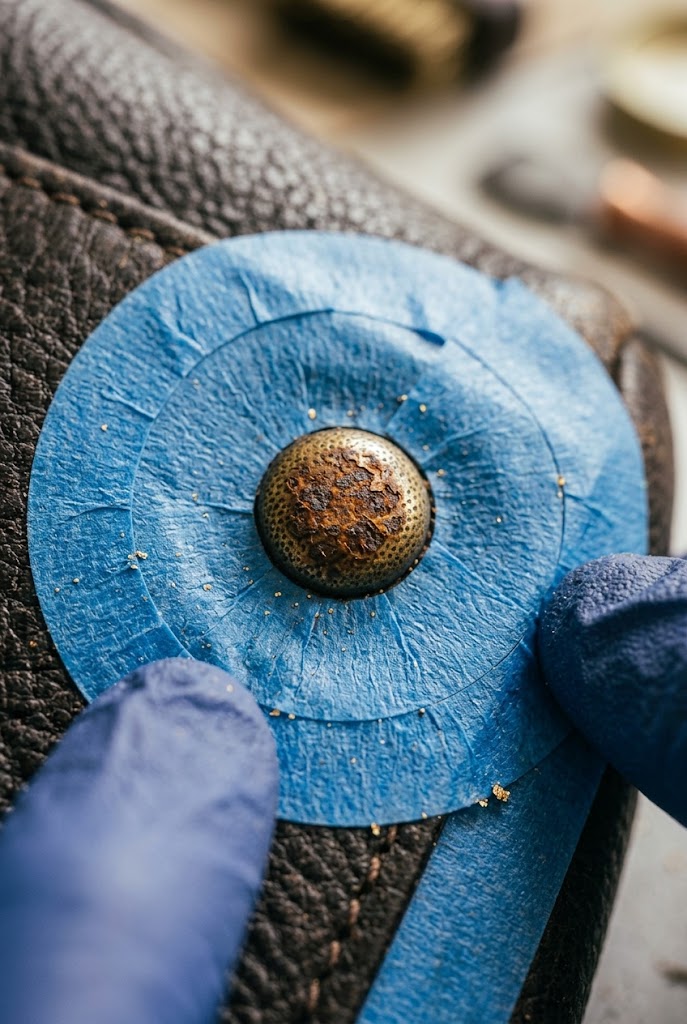
Double-layer tape masking around tight-set rivet caps creates a controlled work zone that keeps polish contact limited to metal only.
Start with the bag flat on a clean, well-lit surface.
Cut painter’s tape into narrow strips, roughly 2-3mm wide for tight rivet clusters.
Apply the first layer directly against the rivet base, tracing its exact circumference.
Press the tape down with a fingernail or wooden tool to seal every micro-gap.
Add a second tape layer just beyond the first, overlapping slightly for a reinforced buffer zone.
This double barrier matters most on tight-set rivet cap detail cleaning, where hardware sits flush against leather with almost no clearance.
Leave only the rusted metal surface exposed, nothing else.
Check the seal by gently running a fingertip around the taped edge before moving to product application.
Corner piping is especially vulnerable here, since rivets are frequently set right along the piped edge. If rust staining has already reached your bag’s trim, address it directly with our guide on how to repair handbag corner piping.
2. Precision Paste Application
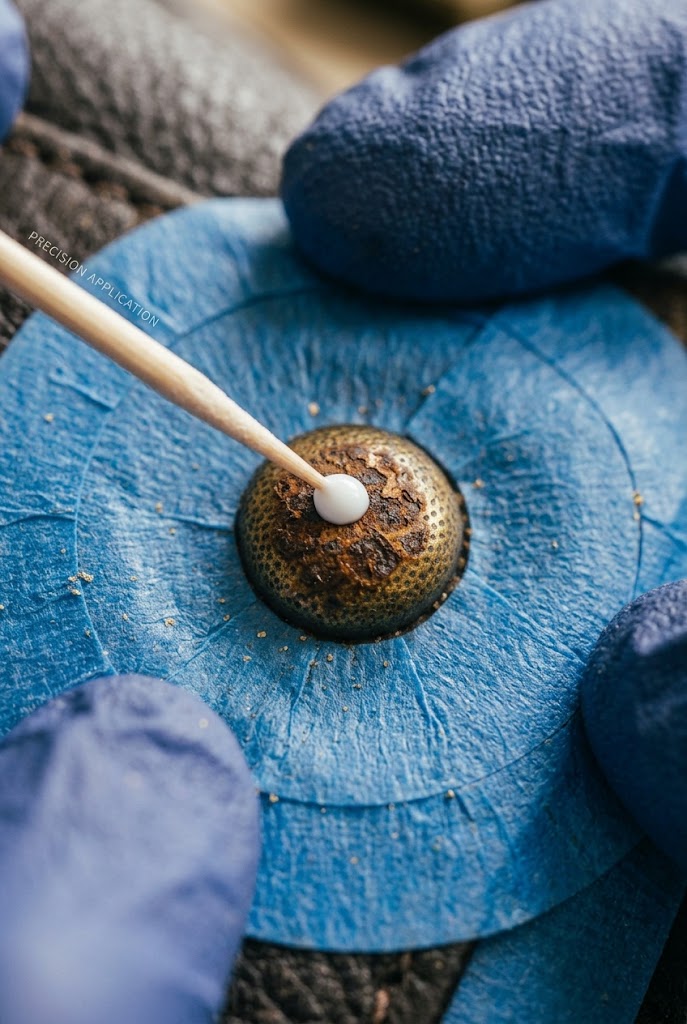
Work begins with a pointed cotton swab, not a saturated one.
Dip just the tip into the non-acidic metal polish, a pea-sized amount goes a long way.
Apply the polish as a single micro-dot directly onto the rust, not around it.
Let the paste sit for 15-20 seconds before any agitation. This softens oxidation without forcing it.
Begin precision rust micro-buffing using small, controlled circular motions.
Keep the swab tip moving in tight circles no wider than the rust spot itself.
Reload the swab with a fresh micro-dot every 20-30 seconds rather than pressing harder.
Watch closely for any polish creeping toward the tape edge, stop immediately if it does.
Overflow onto surrounding threads is the fastest way to undo careful stitching seam protection, so pace matters more than speed here.
Switch to a clean swab section as soon as the tip picks up visible rust residue.
3. Residue Neutralization and Drying
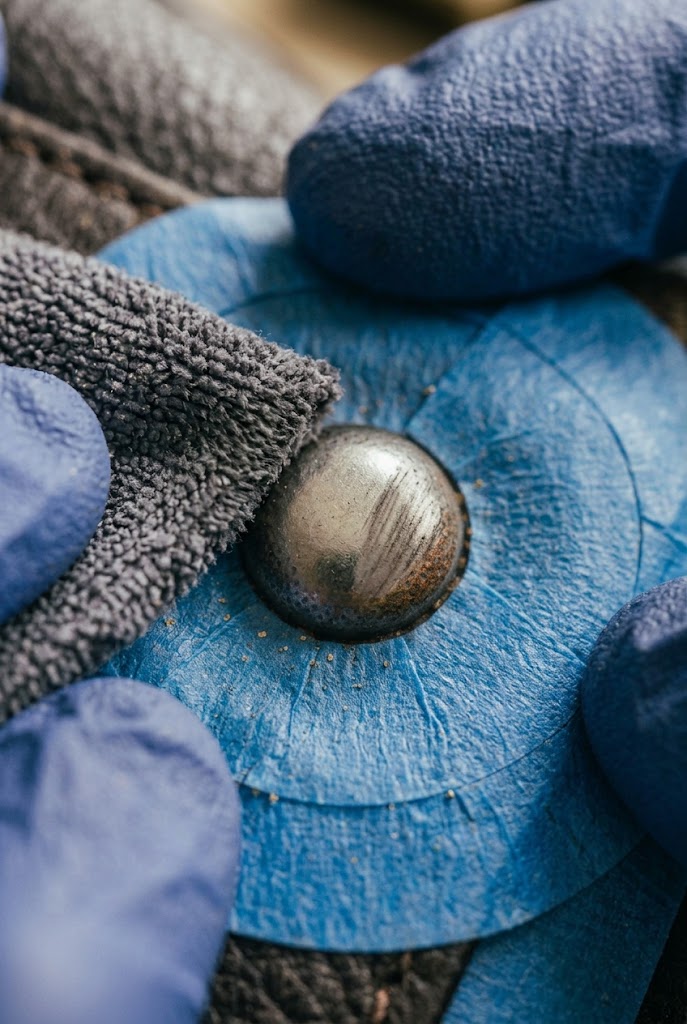
Once the rust lifts, a fine gray-brown slurry remains on the rivet surface.
That slurry still carries active polish chemistry, so leaving it in place risks further oxidation.
Dampen a microfiber cloth corner with distilled water, never tap water, which reintroduces minerals.
Wipe the rivet in one direction, away from the leather, not back and forth.
This single-pass motion is key to neutralizing metal polish residue without pushing it toward the tape line.
Dry the area instantly with a second, completely dry microfiber section.
Any lingering moisture left on plated metal restarts the oxidation cycle within hours.
Once fully dry, remove the tape slowly, pulling back on itself rather than upward.
Apply a light carnauba micro-wax layer with a clean applicator to seal the polished surface.
This wax barrier slows future moisture penetration, giving the rivet meaningfully longer protection between cleanings.
Cosmetic vs Structural Rust (Evaluating Rivet Integrity )
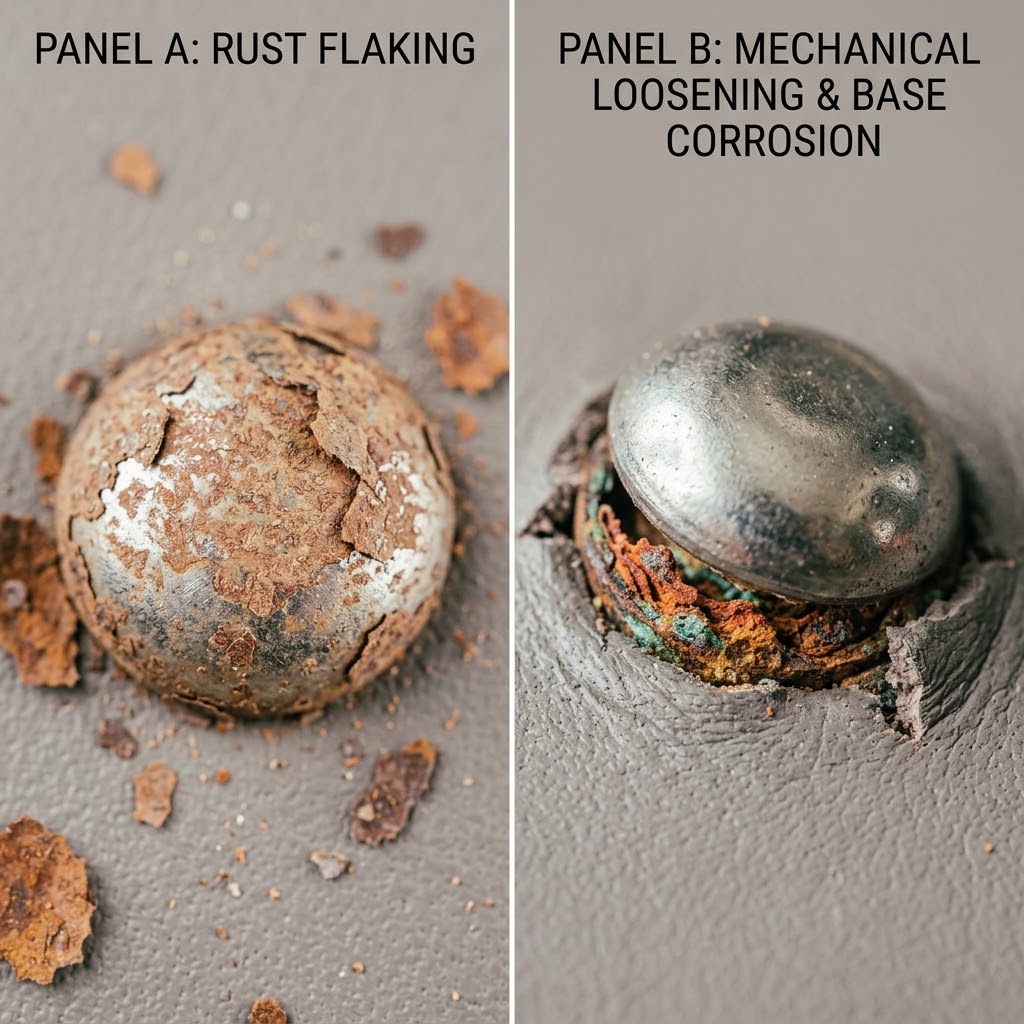
Surface rust turns into structural rivet weakness the moment the rivet loses its ability to hold tension between the two leather layers it’s clamping.
That distinction changes everything about how to clean rust off handbag rivets versus when to stop and replace them.
Light surface flaking is purely cosmetic. It sits on the plating and wipes away with polish, leaving solid metal underneath.
You’ll recognize it by dry, powdery reddish spots that don’t shift the rivet cap at all.
A loose rivet is a different category entirely.
If the cap rotates freely or the base wiggles when pressed, the steel core has already thinned from internal oxidation.
A spinning rivet means the post itself has corroded down in diameter, losing its grip inside the leather channel.
At that point, polishing the surface does nothing, the failure is underneath, not on top.
Sheared or snapped rivets are the most advanced stage of structural rivet failure, and no amount of surface cleaning restores their holding strength.
Any handbag hardware replacement criteria worth following draws the line here: cosmetic rust gets treated, structural rust gets replaced.
Unsure if your rusty rivet is just dirty or structurally compromised? Run your hardware through our interactive Hardware & Corner Damage Estimator to determine if you need a simple polish or a full studio rivet replacement!
Prevention Protocols (Humidity Control and Storage Habits)

Most rivet rust traces back to one root cause, ambient humidity, not water exposure.
Keeping storage conditions between 45-55% relative humidity is the single most effective long-term defense.
Above that range, moisture in the air slowly condenses on metal surfaces, even inside a closet.
Below it, leather can dry out and crack, so the target window protects both materials at once.
Breathable cotton dustbags are essential, they let trapped moisture escape rather than pooling against the hardware.
Silica gel humidity control packs placed inside the bag actively absorb ambient moisture between wears.
Replace or recharge silica packs every few months, since saturated gel stops working without warning.
Airtight plastic bags are the opposite of protective, they seal humidity in rather than out.
Over weeks of storage, that trapped moisture condenses directly onto rivets and clasps, accelerating oxidation.
Preventing rivet rust in storage ultimately comes down to airflow, stable humidity, and rotating bags out of storage periodically to check hardware condition.
Final Summary Checklist
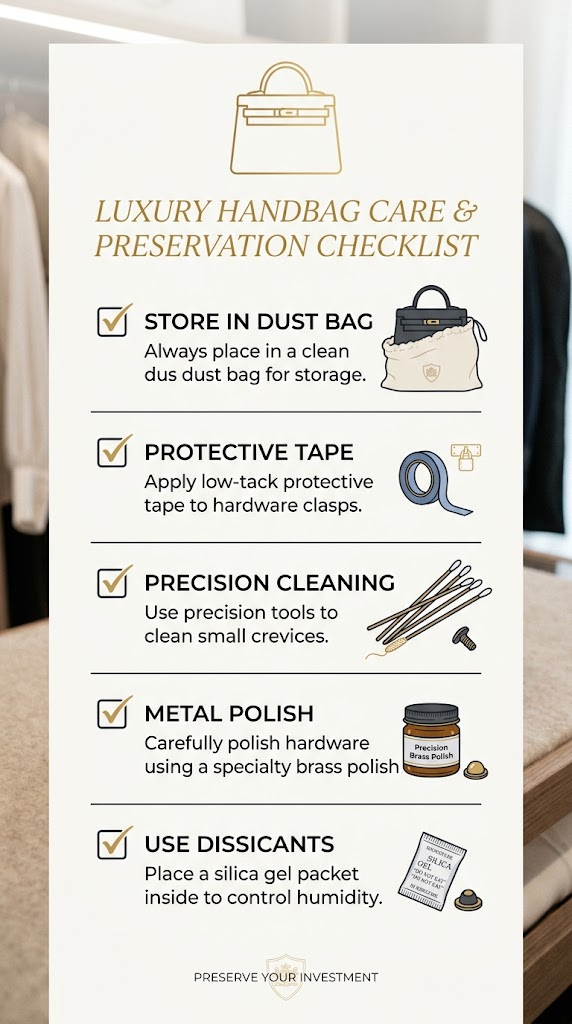
Every safe repair comes back to the same four rules.
Isolate the rivet completely with double-layer painter’s tape before any product touches the metal.
Use only micro-abrasive, non-acidic polish applied with a pointed swab, never a saturated cloth or bulk application.
Avoid liquid acid soakings entirely, since pooled liquid finds its way into stitching and leather pores within seconds.
Finally, monitor rivet tightness throughout the process, the moment a cap spins or wiggles, stop cleaning and reassess for structural replacement.
Frequently Asked Questions
Q1: Can vinegar be safely used on rusty rivets?
Vinegar is a common household fix, but it’s genuinely risky on luxury hardware. Its acidity dissolves rust quickly, but that same acidity leaches into stitching threads and surrounding leather pores almost instantly on contact.
Once absorbed, vinegar reacts with leather tannins to create dark, blotchy staining that’s often permanent. Worse, any residue left on the plating can accelerate future rusting by keeping the steel core in a mildly acidic, moisture-retentive state.
Q2: What should I do if a rivet becomes loose?
A rivet that spins or wobbles during cleaning is signaling something beyond surface rust. That movement almost always means the internal stem has thinned or fractured from corrosion, and no amount of polishing restores its clamping strength.
At this stage, stop all cleaning immediately to avoid worsening the damage. This calls for professional studio replacement, where the compromised rivet is drilled out and reset with a matched hardware piece rather than repaired in place.
Q3: How do I prevent rust from returning?
Prevention starts the moment cleaning ends. Sealing the freshly polished rivet with a light carnauba micro-wax layer creates a barrier that slows moisture penetration into the plating’s microscopic pores.
Beyond that, long-term control depends on environment. Keeping bags in 45-55% relative humidity, away from damp closets, bathrooms, or basements, removes the moisture source that caused the original corrosion in the first place.
Q4: Will Cleaning Rust Off Rivets Reduce Resale Value?
Done correctly, precision rust removal typically protects or even improves resale value. Buyers and appraisers consistently favor hardware that shows careful maintenance over hardware left untouched, since clean rivets signal a well-cared-for bag overall.
The real value risk comes from inaction. Active iron oxide corrosion doesn’t stay contained — left untreated, it continues expanding, cracking plating further and eventually staining the surrounding leather, which is a far more costly and visible flaw to buyers than a well-restored rivet.
Pingback: How to Repair Handbag Corner Piping | Luxury Guide